I've mentioned before how much we like our cloth diapers, but they do come with a few difficulties. One problem is that when you are out somewhere and you change a diaper, you need to cart the diaper home. I often forget the ONE wet bag that we bought for $15 and end up using target bags. I wanted more wet bags but didn't want to spend an arm and a leg on them, so I decided to make some. Waterproof baby fabric can be expensive, but a small amount with coupons is definitely cheaper than buying a premade bag online or at Buy Buy Baby.
DIY Waterproof Bag
I'm using this for diapers and wet baby clothes, but these are perfect for sweaty gym clothes if you go to the gym and have sweaty gym clothes. I've heard some people do.
Ingredients:
Enough waterproof fabric for the size of bag you want
Zipper in coordinating color
Thread in coordinating color
Pins
Ribbon for embellishment (optional)
After cutting your fabric into two identical pieces of the size you want, the first thing you want to do is add any embellishments that you'd like. I cut a piece of ribbon the length of the bag and pinned it to what will eventually be the front.

Stitch along the edge of the ribbon to attach it to the front.
DIY Waterproof Bag
I'm using this for diapers and wet baby clothes, but these are perfect for sweaty gym clothes if you go to the gym and have sweaty gym clothes. I've heard some people do.
Ingredients:
Enough waterproof fabric for the size of bag you want
Zipper in coordinating color
Thread in coordinating color
Pins
Ribbon for embellishment (optional)
After cutting your fabric into two identical pieces of the size you want, the first thing you want to do is add any embellishments that you'd like. I cut a piece of ribbon the length of the bag and pinned it to what will eventually be the front.

Stitch along the edge of the ribbon to attach it to the front.

After your ribbon is attached, place the two pieces of fabric right sides together with the wrong sides facing out.

Before sewing the bag together, you want to attach the zipper. To prepare the space for the zipper, baste together the side that is going to have the zipper.

After basting the zipper side, open up the bag so that the wrong sides are facing up and the seam is open. Pin the closed zipper on top of the seam you just sewed so that the zipper fits right on top of the seam.

Make sure that the zipper is open a little bit, and make sure that the zipper is facing down.
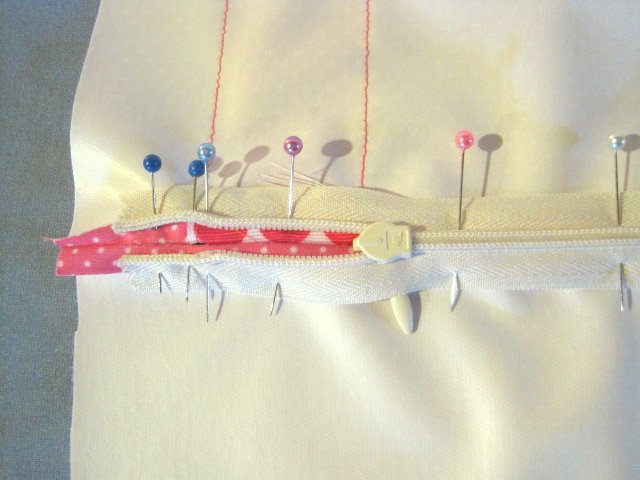
I put two pins at the top and the bottom so that I know where the zipper begins and ends.

Now go find your zipper foot. It looks like this. Make sure that you move your needle over all the way to the right so that you don't break it...not that I have ever done that. (If you don't have one of these zipper feet for your machine, just do your best with a regular foot.)

Turn your bag so that the fabric is right side up, and begin sewing in the upper left where you put two pins. You want your needle to be sewing pretty closely to the teeth of the zipper.

Sew down until you can feel that you have hit the actual zipper zipper thing (what is that called?). Now stop sewing, plant you needle in the down position, lift your pressure foot and do your best to reach your hand under the fabric and zip the zipper all the way back up.

Once you accomplish that, keep sewing all the way down the left side until you hit your double pins at the bottom of the zipper.

Put your needle in the down position, lift your pressure foot, and pivot the fabric so that you are now sewing parallel to the bottom of the zipper. Do three or four stitches to get you across

Once you are all the way across, plant your needle in the down position, lift your pressure foot, and pivot the material again so that you are now sewing up what used to be the right side of the zipper. Sew this side and then when you hit the end, do the same needle-down-pivot move so that the top of the zipper is secure and you've sewn a complete rectangle around the zipper.

Grab your seam ripper and gently rip the basting stitches that are holding the seam above the zipper together. Voila! Fancy zipper.

Now open up your zipper and turn the bag inside out so that the wrong sides are facing out and the right sides are together. Pin the open sides together, and sew it up.

Turn it right side out and tada! All done.

Now go find a cute baby foot to put next to it.

And put it in your diaper bag or gym bag or whatever bag you carry that has wet things in it.


