Macarons are not something that you decide to throw together at 8:30 pm for a snack before bed. One thing that is quite annoying about macarons is that they require a large amount of prep time. Three to five days before you want to make your macarons, grab three eggs and divide them into one bowl of egg whites and one bowl of egg yolks. Here I have done six eggs for two batches. After doing this, cover them and put them in the refrigerator. You will only need the egg whites, so go make some ice cream with the egg yolks...or forget about them and throw them out four weeks later.

The day of making your macarons, pull the egg whites out in the morning and leave them on the counter so that they can get to room temperature.

Another annoying thing about macarons is that you need to measure the ingredients by weight rather than with traditional measuring cups. I absolutely recommend using a digital scale. I think I bought this one online for $15.

Now for the actual recipe:
120g ground blanched almonds or almond meal
200g powdered sugar
100g egg whites
35g granulated sugar

A sifter is going to be your new best friend. I just use one of these little strainers. If you are working with almond meal (Trader Joe's sells it in bags), you want to weigh out a little more than 120g and then sift it, discarding all the stuff that doesn't go through the strainer. Reweigh it so that you have exactly 120g, and set that aside. If you are working with blanched almonds, you need to grind a little more than 120g in a food processor, and then sift and grind, sift and grind and sift until you have 120g that easily fits through the strainer. The almond meal obviously takes less time, but if you are making light colored macarons, the brown specks will show up whereas the ground almonds will have no dark specks.

After you have prepared your almonds, measure out 200g of powdered sugar and 35g of granulated sugar. Please keep all of these in separate bowls for now.
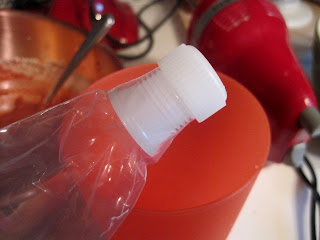
Next, you want to prep your piping bag that you will use to pipe the macaron batter onto the baking sheet. Grab a piping bag, bigger is better, and outfit it with a large circular tip, at least half an inch in diameter. I don't have a good tip, so I just use the coupler.

Twist the bag right below the tip (to keep the batter from sneaking out when you're initially pouring it in)...

...and stick the bag tip down into a large cup. Fold the top of the bag over the sides. This will provide you with a nice little holding place when you are pouring the batter into the bag.

The final prep thing that you need to do is to prepare your baking sheets. Now I am a little crazy, and I have sheets that are reserved only for macarons (and a batch of chocolate chip cookies here and there), but any cookie sheet will do as long as they have a lip all the way around. You want to double stack your cookie sheets. This helps the macarons rise and get those little feet that you so desperately want.
You absolutely want to line your cookie sheet. Parchment works great. Silicon baking mats are good too, or you could get a cool sister in law who buys you a special macaron mat that has little tiny circly areas for each teeny tiny macaron. If you are using parchment, you can trace
this template onto your paper or just put the template underneath while piping. Don't forget to remove it before you cook your macarons, though!
Alrighty, now you are fully prepped and ready to begin. "What?!" you say. "We are just NOW beginning?" I told you they are annoying. Not you...the macarons.
The first thing you are going to do is climb up on your counter top and get down your food processor that you so smartly placed on your very top shelf. In the food processor combine the ground almonds and the powdered sugar. Go ahead and process it for a few minutes, stopping every once in awhile to scrape the settled powdered sugar off the bottom. (My mixture was brown because I took away one tablespoon of powdered sugar and substituted one tablespoon of cocoa since I was making red velvet macarons.)
Once everything is mixed together, you want to grab your handy dandy sifter and sift the mixture one last time.
It's ok to use a spoon to help some of the bigger pieces through. Once you have sifted the mixture, DO NOT TOUCH IT AGAIN! I feel that other macaron tutorials do not stress this enough. You want perfectly sifted powdered sugar and almonds. If you so much as touch it with a spoon after it has been sifted, resift it. Trust me.
Now we are ready to move to on to the most daunting part of the process: the egg whites. Before doing anything with them, though, you want to grab either a metal or copper bowl and stick it in the freezer. This is not just for good luck, you will be using this bowl to whip your egg whites, and the colder it is, the better the eggies will like it. Please do not use a plastic or ceramic bowl for the egg white whipping part; it just won't work very well.
While your bowl is hanging out in your freezer for a few minutes, take the egg whites that have been resting on the counter and measure out 100g. Usually three egg whites is right around there.
After you've measured out your egg whites, pull your metal or copper bowl out of the freezer, and pour in your egg whites. Using a hand held mixer (Please don't use a Kitchenaid stand mixer for macarons. Some people recommend it, but I find that something always goes wrong when using it. I can give you my list later.), beat the egg whites on low until they are all bubbly, like so. Once they start to bubble up like this (maybe 30-60 seconds), turn up the speed to med.
When your egg whites begin to look a bit more fluffy and frothy, go ahead and start adding the granulated sugar by the half teaspoon. After each addition, be sure to mix thoroughly so that all the sugar is dissolved before adding the next spoonful.
Your egg whites should start to thicken up and look like this.
You should look like this.
Keep on beating. After a few minutes, you will see that your eggs are getting very thick and white. Stop your mixer and pull it straight out of the egg whites. If the peaks that you make when you pull out the beaters bend, then your egg whites are not ready and you need to keep beating them.

Keep beating and checking in 30 second increments so as to avoid over beating the eggs. Once the peaks no longer bend, like so, your eggs are ready!
At this point, you want to add any food coloring that you plan to use. I prefer using Americolor gel food coloring. Put a big ol' dollop in there and carefully mix it in using a metal spoon. Your stirring motion should be gently dragging the mixture from the bottom to the top and back down again rather than stirring around and around.
You want to be careful not to deflate the eggs, so don't feel like you need to mix the color completely in. The color you see here will be pretty much what you see in your final macarons, so make any adjustments that you need to now.
Now, grab your bowl of carefully mixed and sifted almonds and powdered sugar and add that mixture to the eggs in thirds, carefully mixing with a metal spoon after each addition.
You want to be sure that all of the dry ingredients are incorporated, but be sure to mix slowly to avoid overmixing.
Your final mixed batter should have lots of air bubbles in it.
Take your bowl and carefully pour the batter into your waiting piping bag, guiding the batter with your metal spoon.
Do not feel like you need to scrape the bowl with macarons. I often find that when I scrape the bowl, I inevitably get a bunch of unmixed dry ingredients into my piping bag and mess up a macaron or two.
Now you are ready to pipe! Holding the top of the bag closed with one hand, use your other hand the squeeze the batter into little circles on your cookie sheet. I find that the best technique is to place the tip directly above the spot where you want to pipe, squeeze the bag while pushing down on the outpouring batter to flatter it out. Once the circle is big enough, pull up swiftly but delicately. You will probably have a little Hershey Kiss looking point, but that is easily flattened with a knife.
Feel free to pipe your macarons very close together. They do not expand much, and this way you can get the whole batch on one sheet. Once they are all piped, grab the tray in both hands and gently bang it on the counter a few times to pop any stray air bubbles.
Set your timer for 40-45 minutes, and leave your macarons out to rest in a cool dry place. (Humidity is very bad for macarons, so avoid making them on super hot, rainy days in Kansas.) This resting time is very important for the macarons to develop those little feet that make them macarons and not meringues. After 45 minutes, the macarons should be tacky and glossy and shouldn't stick to your finger when you lightly touch them. If they need more time, you can leave them out up to an hour. I have found that if they need more than an hour, I did something wrong.

Preheat your oven to 285 degrees. Once it's ready, place your merry little band of macarons on a rack in the lower third of the oven. I do not recommend baking more than one sheet of macarons at a time. Close the door and set your timer for seven minutes. When the timer goes off, open the door and turn your sheet of macarons around so what was in the front is now in the back. Close the door, and set your timer for another 8 minutes. When that timer goes off, check your macarons by lightly placing your finger on top of one and seeing if the top will move back and forth on the feet. If the cookie can move, then set the timer for another 2-3 minutes and check it again. Keep doing that until the cookie doesn't move when you touch it.
Once your macarons are solid little heavenly circles, remove them from the oven and let them cool for a few minutes on the baking sheets. After they don't burn your fingers, move them to a cooling rack and allow them to cool completely.
Macarons can be filled with pretty much anything you want as long as it's not so liquidy that the tops don't stay with the bottoms. Since I was making red velvet macarons here, I decided to use some simple cream cheese icing. I typically just throw the ingredients together, but if you want a really good cream cheese icing recipe, use
Ms. Humble's Whipped Cream Cheese Frosting.
Now you just need to match them up, ice them, and put them on display! Typically, macarons are known for being better the day after being cooked so that all the flavors have melded together. I usually stick them in the fridge overnight in a sealed Tupperware.


